Have you purchased an air-to-water heat pump? Or are you thinking about it? And you've found the ideal location for the outdoor unit? Now all you have to do is build a good concrete slab for the outdoor unit. heat pump outdoor unit.
Follow this article to get the 8-step method for building a solid, durable heat pump concrete foundation or concrete slab.
Step 1: excavation of the heat pump slab
Now you've found the perfect location for the outdoor unit of your PAC Air Eau extérieure!
If not, you can read all our tips for finding the best location here
Let's get down to business: the first step is to remove the soil. Clearing simply means removing soil from the defined area. This prepares the ground.
- Mark the desired dimensions of your heat pump slab on the floor, using stakes or a spray-paint can. (1m x 1.3m for example). Check that the corners are square.
- Dig into the ground to a depth of 20cm using a shovel. And don't forget to remove stones and other roots, to ensure the future stability of the concrete slab.
- Compacting the soil: you've dug down 20cm. Now it's time to tamp the soil so that it's solid and compact. Use a vibrating plate or pestle. This will stabilize the soil and prevent any settling or deformation in the long term.
- Check that it's level with a spirit level in various places. Adjust.
Step 2: the gravel layer
To improve stability and durability, you will now add a layer of gravel:
If your soil is very damp, or not very stable, you might consider placing a geotextile surface between the soil and the gravel.
- Crushed gravel is a good choice. It's more stable. The ideal gravel size is between 10 and 20mm. For example this gravel goes well.
- Spreading the gravel: spread the gravel evenly (with a rake) over the entire excavated area, to a thickness of approx. 5-10cm. The slab will then be firmly in place.
- Compact: take your compaction tool and compact the gravel to eliminate air pockets.
- Check the level with a spirit level and rake a little if necessary.
Step 3: Reinforcement of the concrete slab for the heat pump
The idea is to install a wire mesh or reinforcement (steel bar).
- Choose welded mesh, which is a set of steel bars welded together. These bars have a diameter of between 6 and 12mm.
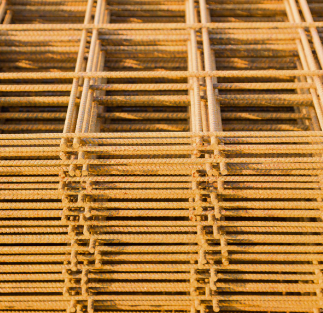
2. If you're using steel bars, weld them together to make a welded mesh the size of the slab.
3. Laying the mesh: install the mesh so that it does not touch the edges of the defined area.
4. If you are using steel bars, secure them together so that they do not move when the concrete is poured later.
Step 4: Drainage
If you have a drainage shaft, you can connect to it. If not, you'll need to create a slope to ensure that the water runs off.
If you choose to connect to an existing manhole, you'll need a sloped pipe to connect to the drain, as well as a siphon to prevent unpleasant odors.
If there's no manhole: you'll need to create a slight slope of 2% during pouring, with the help of a spirit level. The idea is to direct the water as far as possible from the heat pump's outdoor unit.
Step 5 : Formwork for PAC concrete slab
A temporary wooden structure will be put in place to hold the concrete in place until it hardens.
- You can build a formwork using wooden planks or plywood. It must be strong and rigid enough to withstand the pressure of the concrete.
- Measuring and cutting the boards to fit the dimensions of the heat pump slab. Assemble boards to make a rectangle.
- Formwork installation: Lay out your beautiful rectangle around the slab area on gravel + welded mesh. It needs to be well aligned and stable. Use whatever you have on hand to stabilize it. You don't want it to move while the concrete is being poured.
- Check the level: the formwork must be level. The spirit level will help you check that the sides are level.
Step 6: Pouring the concrete
After all these preparations, it's finally time to form the slab itself. Follow the steps below.
- Preparing concrete: either buy ready-mixed concrete or make your own mix like a pro, in the ideal proportions. If you do it yourself, you'll generally need one part cement to 2 parts sand, 3 parts gravel, and around 0.5 parts water.
- Sieve the sand and remove the gravel. Mix the cement, sand and gravel in the concrete mixer until you have a uniform color.
- Add water gradually while stirring. Adjust the water according to the consistency required. The concrete must be moist enough to be malleable, but not too liquid to avoid cracking... it's an art.
- Leave the mixer running for approx. 5 min. after adding the water.
- Use quickly as it hardens within 2 or 3 hours
- Pouring the concrete: Pour the concrete mixture into the formwork from one corner to the other. Use the trowel to spread it evenly and push it into the corners. Watch out for air pockets.
- Levelling: using a ruler or cleat, level the formwork by moving back and forth to ensure even filling. (or with a trowel).
- You can tap the sides of the formwork with a hammer or similar to avoid air pockets. This may give a better slab quality.
Step n°7 : Drying, stripping
- To ensure perfect drying, protect the slab from rain and sun with a plastic sheet covering the entire surface. The tarpaulin must not touch the concrete surface.
- Drying time: allow to dry as indicated on your ready-mix concrete. If you made your own concrete, if you let it dry for 7 days, it will have a strength of 70% compared with 28 days, which will give it maximum strength. Plan ahead
- Stripping: As soon as the concrete is hard enough, remove the formwork. Remove the boards without damaging the slab. Use a prying tool to loosen the boards if necessary.
If you've followed all these steps, your concrete heat pump slab should be ready!

Julien G.
Juliena mechanical engineering graduate and specialist in climate engineering since 2009, has become a writer specializing in renewable energies, with expertise in heat pumps and photovoltaic solar panels for individual housing.
See all articles by this author